Showing posts with label Strategy. Show all posts

Saturday, November 16, 2013

Painting my latest 40k model

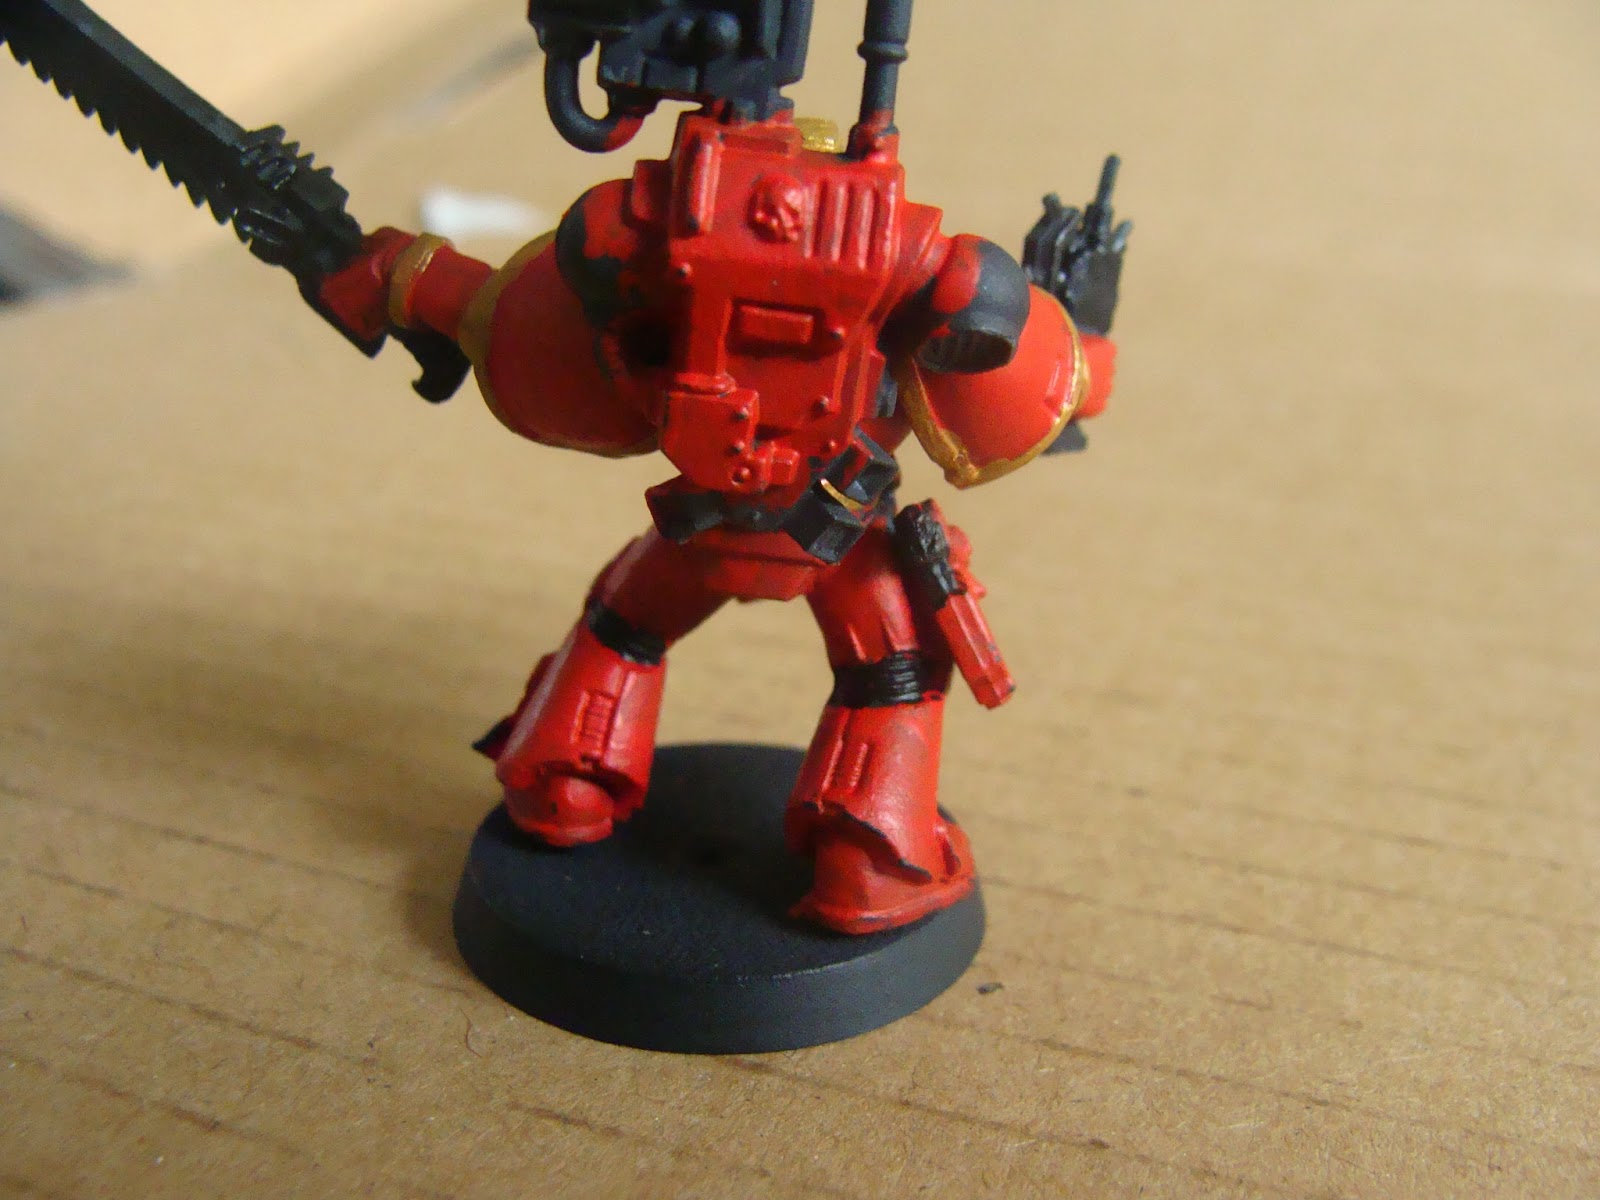
I decided to take some pictures and describe the steps I take when painting 40k miniatures. I am painting a Blood Angel Devastator Squad Sergeant. I didn't get pics of the assembly, or the priming.

Step 1, Priming - I used a black spray paint over the entire model. I use a flat black as a base coat on my entire army. I want my army to have a dirtier, war-torn look. I don't want them to look spiffy and brand new and not battle tested, like a brand new space marine straight out of space marine boot camp. While a big portion of that look is achieved by applying a wash later, it starts with the black base coat.


Step 2, Painting the Majority Color - I used a citadel paints layer. The color is "evil sunz scarlett". The reason I use a layer is so it doesn't completely cover up the black base coat, allowing some of the black to show through and give it that dirty look I am going for.

   I apply the paint pretty generously, giving two to three layers until I have the right amount of base coat showing through. At this stage, I don't worry about splashing paint onto other parts of the model, as I will be covering those parts up with a different color later.

   While I am using my red, I go ahead and paint his eye and breather. The helmet will end up being a gold metallic, but I get the low points now so it makes detailing easier later.


Step 3, The Helmet - The helmet of my units is something I like to diversify a little bit. My leaders normally have a 'custom' helmet, while my rank and file soldiers have the usual red helmet. For my devastator squad, I decided on going with a silver helmet and silver trim instead of black trim, since they are an elite squad (and have performed VERY well in play testing). For my leader, I decided to go with gold instead of silver to set him apart from the rest of the squad.

   Using a metallic acrylic gold in the FolkArt line, and a detailing brush, I apply a layer of paint over the entire helmet, outlining the eye and breather. Because this brand of paint is thinner, it takes several layers to cover it properly. Also, it doesn't dry as quickly as citadel paints, so this step takes a while between layers.

   I splashed a little gold into the eye socket on my second layer. So I had to go back with the detail brush and a drop of red to fix it. And since it was a recessed spot, I had to go back over the outline with gold.

   I used a citadel color, "abaddon black", for the antenna and hoses on the helmet. This color is a base, so it covered up any splashes easily.


Step 4, Trim - Using the same color as the helmet, I outlined all the areas that would normally be trimmed in black, like the outline of the shoulder pads, elbow pads, etc. This part takes a while due to the constant back and forth of colors. Anytime, I make a minor mistake, I have to switch colors to correct it.
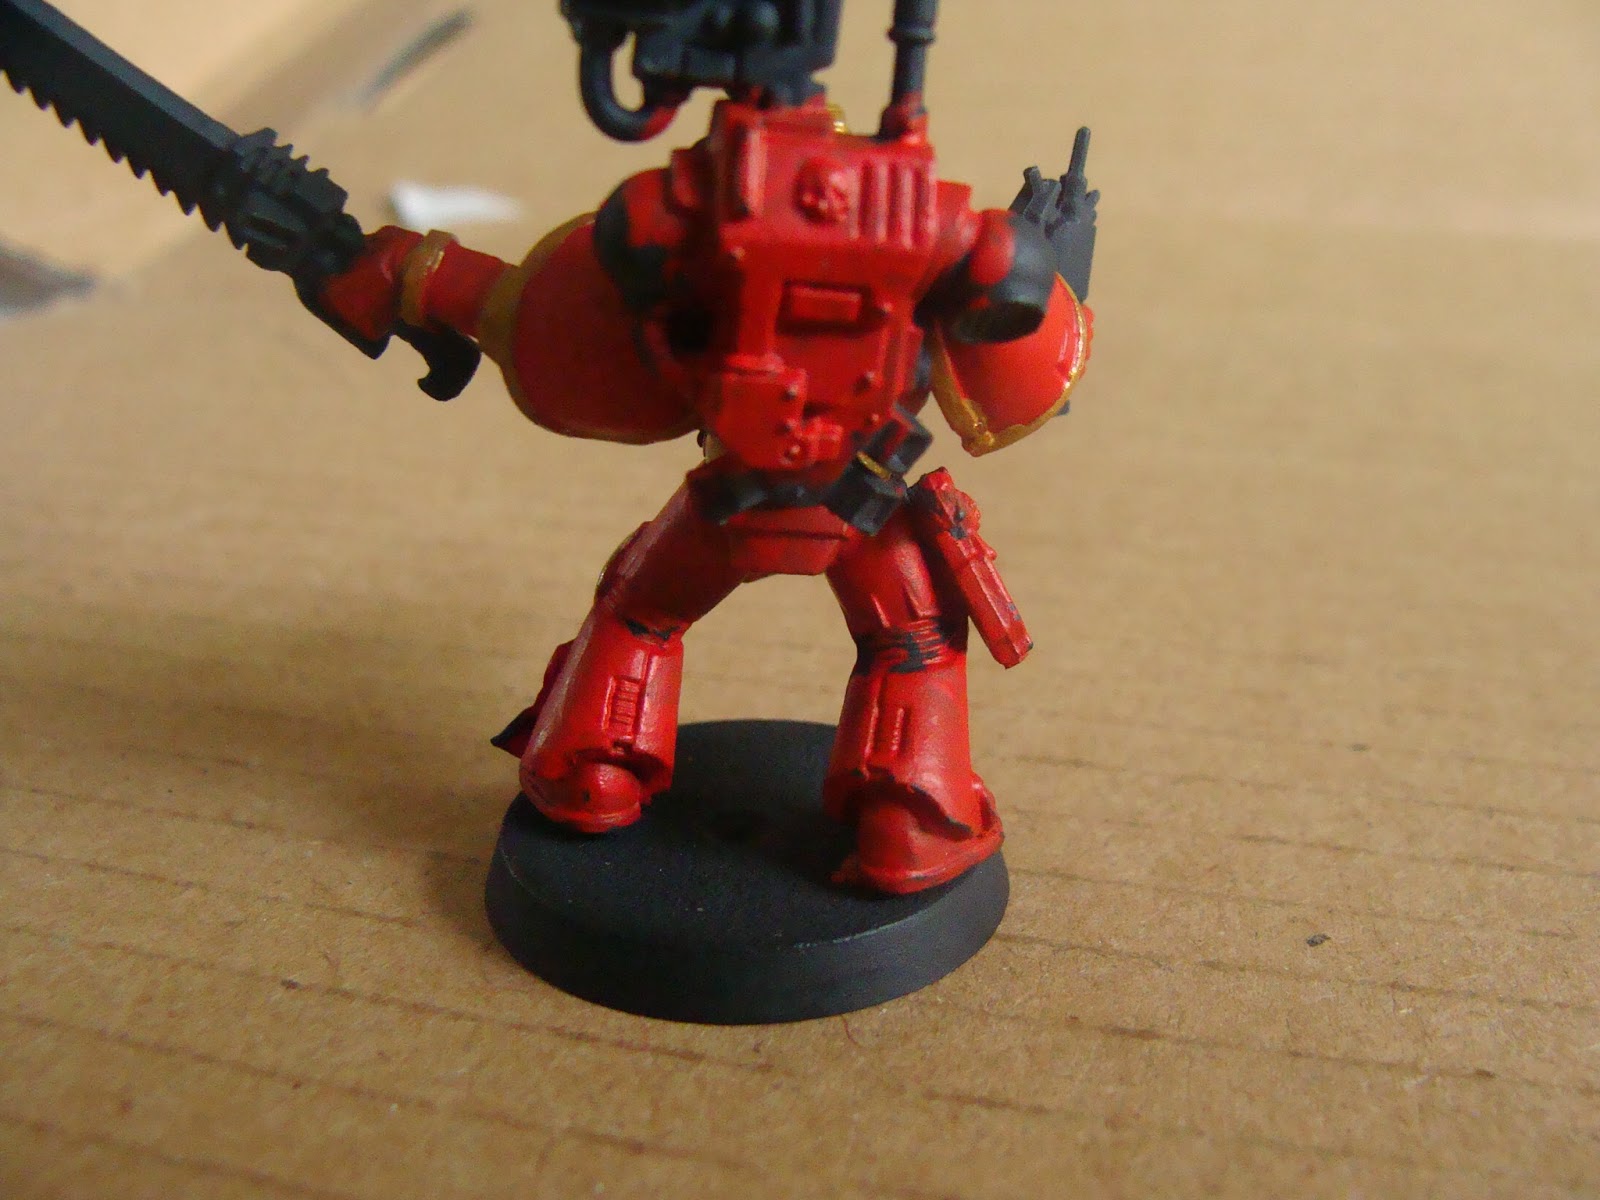

   Normally, I don't color the knee pads, but to break up the monotony I decided to paint them the same gold color.

   It was at this point that I realized why I thought the gold and the red looked so good together, and why it looked like something was missing when the knees were still red. Look at the picture. Look closer. Got it yet? If not, look again. ... ... ... IRONMAN!!!!!

   At this point I'm hoping that the coloring of some of the details, especially with the purple and white coming up that it will no longer look like Ironman when it's finished. Part of me wants to continue with the similarities for fun, but I need to keep in with the theme of my army. (Who am I kidding?! I am eventually going to have a darth vader model be my commander!) So I decided to keep going with my normal paint scheme instead of going crazy with it.


Step 5, Joints, Hoses, and other things that need to be black - This step is all about putting black paint into recessed areas, like the back of the legs, under arms, and then re-blacking any parts that got splashes on them. Normally this goes in with the trim, since I usually trim in black. But since I did gold for trim, I obviously had to split the steps. (Can't paint two colors at one time.) Once the black is in the recesses, I take red and outline the splashes to keep the black contained. This also serves to give another layer and add some depth to the red.


   I also went back in this step and colored the belt buckle gold, as I failed to hit it last step.


Step 6, Weapons - Unlike the armor, which shows signs of wear, I like the weapons to maintain a crisp appearance. Any soldier worth his salt is always cleaning his weapons, keeping them in tip top shape for battle. I black them nice and crisp, and then add some little details, such as silver blades for the chainsword using citadel paints "ironbreaker".

   I also decided to paint a screen on the signum, adding just another little touch of realism. I used a paint that I don't know, as it was given to me by someone else. It's kind of a diminished neon green. I wanted to mimic the green screens of some of the old military equipment of the US Army.

   I then decided to use a black metallic acrylic from FolkArt on the chainsword and bolt pistol, just to add some more snap.


Step 7, Chest emblem - I paint the imperium emblem with a white skull, (Citadel "ceramic white"), silver outline, and layered wings of red and purple (Citadel "xereus purple"). Always start with the most recessed areas first, or you'll have to go back and do them anyway. While I have my purple out, I go ahead and use the purple on the wax seals of the marks of honor. Then I'll use Citadel's "screaming skull" to give the marks a parchment look, and then finish up with small lines of black so mimic writing.
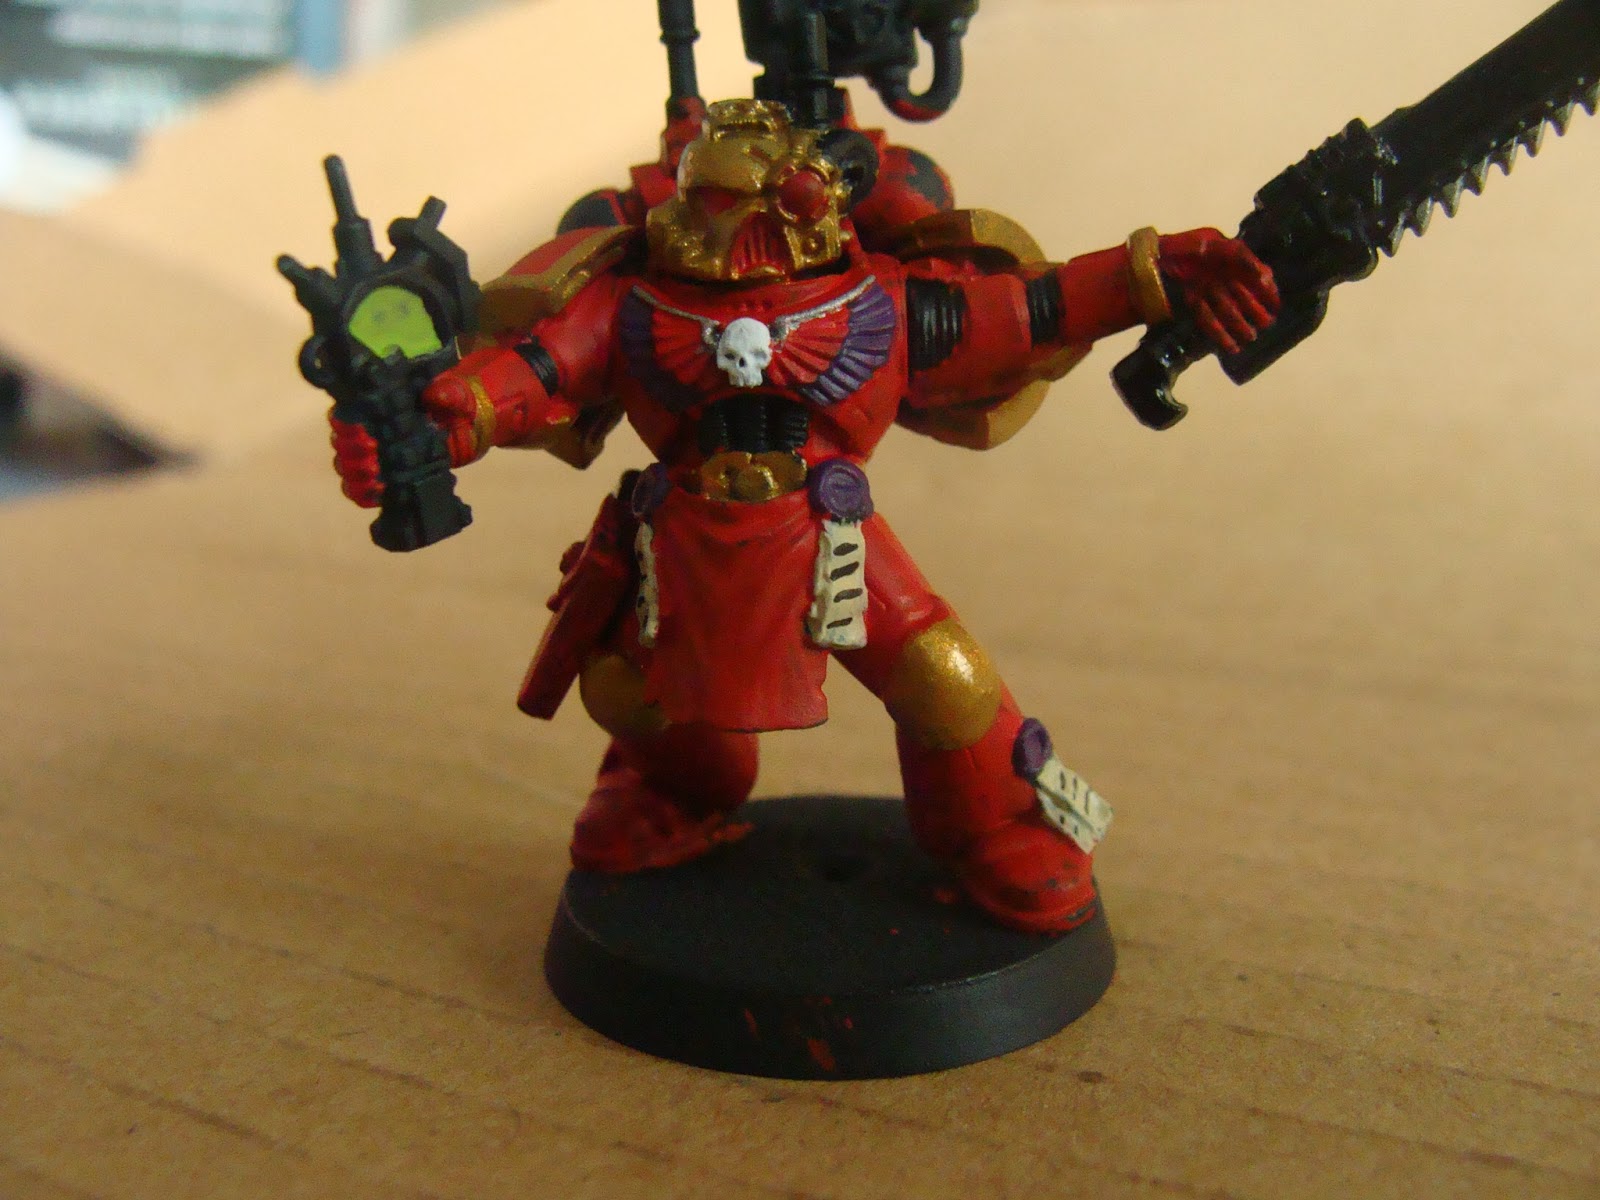
 

Step 8, The Backpack - I use a similar pattern on the backpack that I use for the emblem. It's pretty straight forward, start with the recesses again, and then work your way out.


Step 9, Rangefinder - I decided that the rangefinder on top of the backpack should be treated like a weapon. So I put some black metallic on it, and then touched up the antenna, and put some minor details on the rangefinder.


Step 10, Banner - Here's where things get bad for me. I can't freehand that well. I put a silver border around the banner, and made the frame it was hanging on red. I then tried freehanding a skull on it, but it sucked. So I put red "D" on it for the devastator squad overlaid with an "A" for Alpha Company. I painted the emblem on top like the chest emblem. In this step, I added an "AD" on his left shoulder, for "Alpha Company, Devastator", and an E7 rank on his right shoulder.


Step 11, Dirtying it up - For the last step, we take Citadel "dryad bark" brown, and water it down quite a bit. Then we paint several layers over the whole model, allowing it to dry in between layers. This gives the whole model a dirty, war-torn look. It also highlights the low areas, bringing in some shading. Watering down the paint allows it to wash off of the raised areas, and collect in the low areas, meaning they'll be darker; just like how in real life dirt will collect in cracks more than all over.


So there you have it. The whole process took me about four hours. I'm getting better at painting. Not at good as I'd like to be, but way better than where I was. My goal is to eventually be able to paint and get paid for it. Long way off, I know, but I'm getting there.

 - Sapper Woody

Saturday, November 10, 2012

DPS or Survivability?

   A huge debate is going on right now in Diablo 3. The “end all” stat it seems right now is DPS. You will find people looking for someone with a certain DPS in order to run higher monster powers. Many people boast about how their DPS is over 100k, or even higher. Some Demon Hunters can get their DPS to over 250k if they are out of combat long enough, due to a passive.

            Now, this DPS number is often inflated, as in the case of Demon Hunters, as soon as they get into combat and hit their first enemy, their critical chance drops from 100% to their regular levels. They have a passive ability that every second that they don’t get a critical hit, their critical hit chance goes up. So, as long as they are standing around, it looks better than it actually is. But this is not the point of my post.

            This post is going to take a look into the formula behind survivability and DPS, and decide which is better. If you can deal 100k DPS, but die in 2 seconds, you’re not doing very well. Conversely, you may be able to withstand any kind of damage, but if you can’t kill elites or bosses before their enrage timers go off, you are useless.

            So, it’s kind of obvious to me (and hopefully to you, too) that a balance has to be maintained. But how do we determine which we need? Do we need more all resist, or critical hit chance? Do we need more armor, or critical damage?

            By taking the formula that is used to decide certain things, and then comparing the results, we can see what will be best in our current situations. First off, here are some formula used by the game:

Damage Reduction From Armor = Armor/(50*Enemy Level+Armor)
Damage Resist = Resist/(5*Enemy Level+Resist)

As you can see, the armor and resist scale parallel, with 1 resist being worth 10 armor.


As the chart to the left shows, armor (and resistances) has huge diminishing returns. The chart assumes a level 63 enemy.


The first 500 armor (50 resist) give 13.7% damage reduction. The second 500 (50) gives only 10.4% damage reduction. At 9500 armor (950 resist) the next 500 (50) only gives .95% damage reduction.


Now, don’t get me wrong, stacking armor is never a bad idea. But, stacking it to the exclusion of a stat that might help you out more is a bad idea.


   The point here is that there is a point where it is pretty much useless to stack more armor. Diablo 3 doesn’t have an armor cap, but with diminishing returns, it would take 25,000,000 armor to equal a 99.99% resistance. Technically speaking, you could never reach 100%, since as one value grows, you are dividing it by another value that grows in proportion. Eventually, you’d round up to 100%, but you’d never truly be there.

   Now, we have DPS. To determine overall DPS as shown on your character sheet, you use the acronym SCRAM. In this example, we’ll use my Barbarian’s numbers (unbuffed).

S = Your damage attribute * .01 + 1    In my case, S = 1996 * .01 + 1 = 20.96

C = Crit Chance * Crit Damage + 1     In my case, C = .2 (20% crit chance) * 1 (100% crit damage) + 1 = 1.2

R = Attacks per second, including any attack speed modifiers.  For me, R = 1.1

A = Average Damage. (Min DMG + Max DMG)/2    For me, A = (1021 + 1515) / 2 = 1268

M = Any damage multipliers from skills, plus 1. I have none, so I am just at 1.

Then, you multiply each value together. My Barbarian:

20.96 * 1.2 * 1.1 *1268 * 1 = 35082 DPS

   So now we know how to find resistances and DPS. But, how do we decide which is better for us? Well, this involves a comparison of current stats to possible future stats. I can’t sit here and say something like “1 armor is equal to 3 DPS” or anything like that, because for you, 1 armor might be worth 17 DPS, or vice versa. If you are stacked on armor, your armor has a lesser value than someone who isn’t.

   So, to figure out which is best for us, we need a common denominator; something to bring these equations together and give them a common ground to compare them, so that we can compare apples to apples instead of apples to oranges. In Diablo 3, and also in many RPG games, this number is the amount of damage that will be dealt to you by a monster throughout the course of a fight.

    There is a long formula to find this number, but we will break it down. But I want to impress you with my formula, so I am going to write it in it’s entirety here:

Enemy DPS * (1 – (armor / (50 * enemy level + armor)) * (1 – (average resist / (5 * enemy level + average resist)) * (Enemy Health / ((Damage Attribute * .01 +1) * (Crit Chance * Crit Damage +1) * Attacks per Second * ((Minimum Damage + Maximum Damage)/2) * Damage Multipliers)) = Total damage done to you

    Basically, this formula is saying that we take the enemy’s DPS adjust it for your resistances, and then multiply it by the amount of time it will be alive. For myself, I have made a spreadsheet that I can put the raw values in, and it will give me a baseline total damage done to me. Then I can tweak the numbers, and change some resistances, and then compare the new results. Then I can tweak other numbers, and compare the results to the previous results, allowing me to decide if I need more resists or more DPS. Here is a screenshot of my current values, in which I used the information of a Dark Thrall from Inferno difficulty. I filled in the yellow areas, and the blue areas auto populated.

The “NET DMG to You:” number is the number we want to reduce. Pretty much, increasing any attribute will reduce this number. As you can see, I inserted the “NET DMG to You” number in the “Base NET DMG” box. Next, I decided to see what happened when I changed my armor to 5,000. And this is the result:
As you can see, the “NET DMG to You” went down to 4687.54. I inserted this number into the “Change with RES”, and the “% Gain” box populated to show a 6.63% increase in efficiency. So, for me, 534 armor would give me 6.63% more efficiency.

Now, I am going to put my armor back where it was, and compare it to a 5% increase in Critical Hit chance. And this is the result:
As you can see here, 5% more critical hit chance brings my “NET DMG to You” down to 4819.76. I plug that in to “Change with DPS”, and the “% Gain” auto populates to a 4% increase of efficiency. So, when you compare the two, you see that 534 armor is worth more to me in my current state than is 5% critical hit chance.

   One thing my spreadsheet is not programmed to do is to take into account the fact that strength also adds to armor. I also have not taken into account that Dexterity adds to dodge chance. So, if you change those numbers, you might have to account for the armor and dodge chances manually.

   So, as you can see, sometimes DPS is not the end all stat. Sometimes, in order to deal more damage, you have to be able to take more damage.

 I wasn't able to embed the spreadsheet in this post, but if someone wants it, just zip me an email at sapperwoody@live.com and I can email it to you.

            - Sapper Woody

Tuesday, April 24, 2012

Gears of War 3 Horde Mode Boss Guide

    Seeing as some of the traffic to my website was being generated by people googling “Gears of War 3 Horde Mode” or variations of it, I figured I’d better post this sooner, rather than later.
   We will be discussing how to beat all the bosses in GoW3 Horde Mode, and handling each boss specifically. But first, a little overall advice: clear out the wave first if you can. The bosses all become very easy to kill if you can clear out all the “little” guys. The word “little” is in apostrophes, because more often than not, bosses are accompanied by the big hitters: boomers, maulers, grinders, and kantus. I will be posting another guide on all the “little” guys, but as a rule of thumb, kill them all first.

   You will need to learn how to kite, if you don’t already know. You can read about how to kite here. Also, this guide will be how to kill these bosses by yourself. If you have friends, this whole process becomes even easier.

   Now, on to the bosses!

   Berserkers: Berserkers can be tough. However, they are very dumb, and only utilize melee. The easiest strategy to beating a berserker is to use a scorcher (flame thrower) on him. He will cover his face and stumble around for a few seconds while on fire, and becomes more vulnerable to bullets while in this state. Once he goes back to normal, simply use the scorcher on him again. Rinse, repeat.

   Always keep an obstacle between you and the berserker if possible. This makes his charges easy to avoid, as he’ll charge right into the obstacle. If you can’t keep an obstacle between you, it’s still pretty simple to just roll out of the way when he charges.

   Lambent Berserkers: The lambent berserkers are easily the hardest enemy to beat. This is because they are only susceptible to weapons when they are about to charge or jump, or right after charging or jumping. They also only utilize melee, and so the kiting tactic works with them.

   They have a yellow/gold area on their chest that is their only weak spot. Unfortunately, this is covered by bone unless they are attacking, as I said above. The best way to beat them is to have quick reflexes. Let them get close enough to charge, and that spot will open up for a second. Do enough damage and it will stop their charge, making them stagger for a few seconds while still vulnerable in their chest.

   If you don’t do enough damage to stop their charge (or just want to play it safer), then roll out of the way while they charge, and then shoot the open area while they recover from the charge. This same tactic will work if they are jumping.

   Savage Corpsers: Savage corpsers take a while to beat, but are pretty easy. Their legs are impervious to weapons, but their head and abdomen are soft spots. They will walk straight towards you, and you can shoot them in the head. When you do this, they will cover their face with their legs, and can’t be hurt in their head (they can still be hurt by shooting their abdomen during this time.

   If you do enough damage by repeating this cycle, they will eventually rear up and scream in pain. You can take this time to unload on them. For this reason, reload anytime they cover their heads, so you’ll have a full magazine to unload into their soft belly.

   If they get too close, simply roll out of the way, and run. They can’t keep up with your sprinting.

   Eventually, they will burrow under the ground. An arm will come up and chop at you, but is easily avoided through rolling and running. After that attack, they will burrow towards you, and rise up suddenly. Dodge this, and the cycle starts over.

   Brumak: This guy’s difficulty depends on the map you are playing. There are some doorways that he can’t get through on some maps, so the strategy is obvious: hide in there.

   For other maps, you’ll have to make sure that you are behind cover. He has two attacks: machine guns mounted on both of his arms, and a rocket launcher mounted on his back that fires multiple rockets in a barrage.

   You will want to pop out of cover in between bursts of machine gun fire and shoot at the guns on his wrists. Eventually they will be destroyed, and he won’t be able to shoot them anymore, and will only have his rocket launcher.

   When he fires a rocket barrage, sometimes simply ducking for cover will work. But about 1/3 of the time, a stray rocket will miss the cover, and hit behind you. This will down you, and possibly kill you outright. The best idea is to have cover in which you can roll left or right, and dodge the rockets altogether.

   Once his machine guns are down, you can pretty much shoot him wherever. Some guides say to shoot his rocket launcher next. But in my experience, once you down the launcher, he is dead anyway. So just kill him.

   Reavers: When my friends as I see reavers, we get excited, as this is arguably the easiest boss in the game. They have two attacks: machine gun fire and a single rocket attack. The easiest way to beat them is simply to hide behind cover and shoot them. They are basically a mix between grinders and boomers. Their height does give them some advantage, as they can shoot over some lower obstacles, so beware of that.

   Also, the designers knew these guys were easy to kill. This means that if they show up as a boss, you can expect to fight 2-3 of them at a time, and about 5-6 total on that wave.

   They are also an exception to the rule about killings adds first. They are so easy, that you can include them in your killing plan.

   Gunkers: Gunkers can shoot at you from across the map. While not the toughest enemies, they can be the hardest, depending on the map and your base setup. When in close, they can also shoot out an arm that will down or possible outright kill you.

   If you are in an open area, you’ll have to do a lot of rolling around to avoid their ranges attack, which does splash damage. If you are in an area that that has an enclosed structure, sometimes you can get them stuck on an obstacle where they can’t get close enough to you to melee, and they ranged attack hits the ceiling before getting to you.

   If you can’t do this however, you’ll need to shoot and dodge, like stated above. This enemy is annoying, but not necessarily hard. It gets really tedious if you have two of them on the map at the same time. Hopefully you can get them to fire simultaneously, and so avoid both shots at once. The good news is, their shots have a high arc, so you can see it coming from pretty far away, and have time to dodge.

   Well, get out there and beat some bosses!

   - Woody

The Art of Kiting

   To people who play World of Warcraft, especially hunters, the term “kiting” is no stranger. However, I have found in many games (especially RPGs) that kiting can be used to great effect. I have recently used it in Lord of the Rings: War in the North; Dragons Age: Origins; Skyrim; and even in Gears of War 3 (horde mode).
   While the concept of kiting is simple, it can take a bit of practice to master. Also, different classes in different games make it easier or harder to kite. For instance, a pure melee character will find it extremely difficult to kite. Possibly even impossible. However, a class focused on ranged will kite with ease.

   Kiting, at its core concept, is simply hitting an enemy while staying out of range of its attacks. Simple, right? Well, like I said, it’s a simple concept. But in my experience, people think it’s too simple and don’t execute very well. Obviously, we are assuming that the enemy is either pure melee, or its strongest attacks come from melee, and is weaker at range. Kiting doesn’t work very well against ranged. That’s when you get into LOS (Line of Sight) pulling. But that’s another strategy.

   There are a few considerations to kiting. First, is obstacles. The easiest way to kite an enemy is to play “ring around the rosy” with an obstacle. If the enemy is on the other side of the obstacle, he can’t hit you. So, if there’s an obstacle between you, simply hit him with ranged and keep running around the obstacle. This method is not used very much surprisingly, but is the easiest to implement. Even a melee focused character can usually pull out a ranged weapon and use it here. It just takes longer to beat the enemy that way.

   The second thing to consider is the movement speed of the enemy. In WoW, the hunter has traps he can place to freeze or slow the enemy. He also has a pet that can take agro off of him. In other games, you might have abilities that slow the enemy. In an area without obstacles, slowing effects are the way to go. Sometimes you can literally run circles around the enemy while pelting him with ranged abilities. I had to do this on the first ogre in the beacon tower of Dragons Age: Origins. My party had all died, and my mage was all that was left. So I simply ran around the outer perimeter of the circle and hit him with the DoT (Damage over Time) that I had any time it was off cooldown.

   Along with the movement speed of the enemy, is your ability to dodge the enemy. In wave 30 in Gears of War 3 (Horde mode) on hardcore difficulty, I found myself to be the only person left against the final creature, a savage corpser. It was pretty easy to shoot at him, roll out of the way, and run. (I will be posting strategies for beating all the Gears of War 3 (Horde Mode) bosses later on, so see the full strategy there.)

  Last thing to consider while kiting is adds (any little enemies running around). If you can successfully kite them, too, then go ahead. However, there are two strategies to beating them depending on which type of adds they are.

   The three types of adds are infinite, wave, and finite. On finite adds, the easiest thing to do is to get the adds out of the way before focusing on the boss. On infinite adds, focus on the boss, only killing enough adds to stay alive. On waves, if you have time between each wave, kill the adds then focus on the boss between waves. If you don’t have enough time, it’s a race against the clock to beat the boss before the adds overwhelm you.

   Hopefully these little tips will help you in your kiting efforts. If you have a specific boss in a game that you’d like help with, you can shoot me a comment below, and I’ll see what I can do. Of course, with all the tips and tricks out there, it’d be quicker to just google it. But, give me a chance. Who else offers personalized strategies?

   - Woody

Wednesday, March 28, 2012

WoW Battleground Strategy: Warsong Gulch

Warsong Gulch is a classic capture the flag scenario. It is a 10v10 map in which both teams have a flag, and in order to make a capture your flag has to be at its base. This post is an overview of a working strategy for this battleground.

Firstly, at the low levels, there is absolutely no reason to guard the flag in the flag room. Rogue stealths in grabs the flag, dashes out, and then everyone guarding the flag has no way to catch up - taking them out of the fight completely. So, at lower levels there is a slightly different strategy than at levels when you can use mounts. At low levels (before mounts) anyone playing defense actually needs to be controlling the middle of the field, and run interception in case of an enemy flag carry (EFC). Other parts of the strategy remain unchanged. There are two schools of thought, and we will cover them both.

Strategy 1: Just like in CTF on FPS, there are 3 main positions. However, these are even further broken down. Each "position" in this case is actually a team with positions. The teams are: defense, assault, and freelance. Each team needs a healer.

The defense team will most likely be made up of ranged. They need to be able to slow the enemy down somehow. The goal is to keep them enemy from getting away with the flag too quickly. Hunters, Mages, and Priests all make good defense. Hunters especially, as they can place traps around the flag to freeze/slow the enemy. Death Knights also can use their ranged slowing ability.

The assault team will have your flag carrier, a healer, and another DPS to help kill attackers. The flag carrier has to have high stamina and high resilience. Typically a plate wearer with a protection spec will be the flag carrier, due to high survivability. The DPS can be any class. The healer can also be any healer, but instant cast heals are better than cast times due to having to move to keep up with the FC.

The freelance team is a healer and a DPS that is wherever they need to be. They run interception in the middle, as well as general harassment for incoming enemy.

In the case of an enemy flag carry, the defense's job is to get the flag back. The freelance also goes after the flag. The assault team keeps doing its job.

Strategy 2: This strategy is similar to the first, except that there is no freelance team. The defender and assault teams are split evenly, with five in each team. The defender team has one healer, while the assault team has two. The defender team's job is defense and retrieval, while the assault team's job is capture. This strategy seemingly is used more often, and is easier to implement in a pick up group.

The main thing is gear. The FC has to have high armor, high health, and high resilience. The healers have to be able to heal. And communication is key.

All in all, this is a simple game type that can be won as long as you have communication and don't simply fight in the middle.

Wednesday, March 14, 2012

Proper Flanking Maneuver

I was struggling on whether or not to post this strategy for two reasons. First, the advantages to flanking should be obvious. Second, I wasn’t sure exactly what in my military training was made available to the public. So, I went online and did some Googling, and found out what the general public had access to, and am keeping my explanations within that boundary so as to not accidentally reveal any information not available already.

This post will be more applicable to cover based shooters, like Gears of War where you can shoot from behind cover, but will also apply to other shooters like Call of Duty where someone can duck behind cover quickly.

First of all, everyone flanks in FPS whether they know it or not. The enemy is behind cover? Oh, move to the side and shoot him there. This is flanking at its simplest. At the core of every FPS player, he knows this. If you can’t shoot him from where you are, move and shoot him there. This post will talk more about flanking as a team maneuver rather than a single player maneuver. We will treat a team as 6 players.

Proper Movement: When moving as a team (6 players) it is important to stick together. It is especially important in games where you can revive a fallen teammate. Gears of War has done this well. In games where you can’t revive (Call of Duty) it is also important so that you can overwhelm any opposing forces with superior firepower.
   The drawback to this is twofold. A lucky player might be able to spray his way into killing the entire moving team if they are together. This can be negated by proper cover, however.
   The second drawback is that if you are too close to your teammates, a single grenade can kill several of you. This is where communication comes in handy, as well as good situational awareness. When a grenade is tossed into the group, the first person to notice it needs to inform the others. Everyone then gets behind cover, or dives/rolls away as the game allows.
   To properly move in order to conduct flanking, a 6 player team will be divided into 2 3-man teams. One 3 man team will move forward of the other.
This will allow the second team to flank the enemy, instead of getting caught up in the enemy’s fire.

Actions on Contact: The team that takes fire (whether it be the front team or the back team) will “get on line” parallel to the incoming fire, and behind cover. For a simple illustration, we will say that the front team takes fire from the front. The enemy is behind cover. (See illustration, left.)

The team taking fire will immediately move to cover positions, and continue to fire at the enemy. In a best case scenario, the enemy dies there. If not, then the flanking maneuver begins.

The rear team will move off to whatever side has more cover (in this case, the right side), and (keeping behind cover) will then shoot at the enemy’s unprotected flank. (See Illustrations)


1. Team Taking Fire gets behind cover

2. Rear team head up behind cover to begin flanking

3. Rear team sets up behind cover to fire at enemy's unprotected flank.

  1. Front team on line behind cover
  2. Rear team flanking the enemy, remaining behind cover
  3. Rear team firing at enemy’s unprotected flank
As you can see, the process is simple, but not used to great effect very well in FPS. If you were to try and use this exactly, it would probably fail in video games. But, use this as a guide to keep in mind during firefights, and you’ll find that even though doing this “by the book” won’t work very well, using these principles will.

   - Woody

Setting up a Working Capture the Flag Team

First of all, there are three positions on a CTF team. There are the runners, midfield, and defenders. This works on any FPS, but is geared towards the COD franchise. Here is a description of the three positions:

Runner: The runner (R) is the person who tries to capture the flag. He is as light as possible. He uses submachine guns to run quickly, and uses perks which allow him to run faster and farther.

Midfield: The midfield (MF) is used as a front-line defense against the enemy. They work the center in order to keep the enemy at bay. They also work as a line that the enemy runners must get through to capture the friendly flag. He is equipped with either assault weapons, or outfitted like the runner in order to catch an enemy flag runner.

Defender: The defender (D) is just that. He has heavy weapons in order to spray any incoming enemies. He needs to be patient, as under perfect circumstances, he never sees the enemy. He is a lot like the goalie in ice hockey.

Setup: In a 6 person team, you will have 2 flag runners, 2 or 3 midfieldsmen, and 1 or 2 defenders. If you are finding that you are on offense most of the time, have only 1 defender with 3 midfieldsmen. However, if you constantly have to divert your midfieldsmen to defense, then have 2 defenders and 2 midfieldsmen.

Strategy: There are 4 possible scenarios, or stages, of the strategy.
    Both Flags at Bases: This is the “reset” scenario, and will be the state of things most of the time. In this stage, the 2R head up the most unused routes to the enemy’s flag. Their job is simple: grab the flag, and get back. The MF set up watching likely travel routes, attempting to stop the enemy Rs from advancing. The D just wait at the flag, as a last line of defense.
    Enemy Flag Taken: As the Rs take the enemy flag, they obviously start running back. The MFs stay in place to slow down any enemy following the R that has the flag. If the R makes it through the MF line, then the MF fall back to cover him and pick up the flag if necessary.
    Friendly Flag Taken: In the case of the friendly flag taken, the Rs continue to try and get the enemy flag in hopes of creating a standoff. The MFs also assault the enemy flag, serving to help create a standoff and also collapsing in on the most likely route for the enemy flag carrier. The defender really can’t catch the enemy flag carrier, but he can move to midfield in order to just make havoc for any enemy.
    Both Flags Taken: In the event that both flags are taken, it basically becomes the same as the first scenario. The R needs to leave the flag with the D. If there isn’t already, there needs to be 2D. The Rs and the MF need to assault the enemy flag as a group, to overcome the enemy D. Upon taking the flag back, the D holding the flag caps it.

Tips:
1.      No one can be selfish with this strategy. The R must be willing to give up the cap in order to go after the enemy flag carrier if he must. The MF must realize that they aren’t going to be getting many caps, if any. And the D needs to realize that the better team he is in, the less he will be doing.
2.      A proper loadout is important. The R needs to be as fast as possible, and be able to run as long as possible. The D needs to be able to pump out a lot of rounds, to either kill or suppress the enemy until the MF can come help. The MF need to read the situation, and know whether they need a lighter loadout or more firepower.
3.      When the R is running for the flag, make sure that you can sprint when you get into the open going for the flag, and back. Don’t sprint just before going into the opening, or you will risk running out of sprint in the opening, making you be out in the open much longer.
4.      Communication is key. If the D needs help, he has to let the MF know to collapse back. If the R has the flag, he needs to let the MF know which route he is taking back, so they can converge on that route and stop the enemy that is following the R.
5.      Get to know the maps before a match. Know the routes to take, the places to set up, and where the enemy is likely to set up and what routes they will take.

   - Woody

Camping, or Ambushing?

Currently, I am still deployed to Afghanistan, so I haven't been able to play the new Modern Warfare 3 online yet. But some fellow gamers and myself were able to set up a network, and connect several XBOX 360s together to play over LAN.

While we were playing, I was accused of the unpardonable sin. Someone called me a "camper".

I had been sitting in a building, and made 5 kills without dying. All in that same building. Because of this, they said that I was camping.

Scenario: Someone was in the building. I went upstairs and killed him. I saw a firefight outside and knew that they would be coming upstairs. I killed two people coming upstairs, then knew that they'd be coming for me. So I placed a bouncing betty, moved into a corner, and killed them again when they came up. I then moved on to play regularly.

Basically, the purpose of this post is to explain the difference between bad camping, good camping, and ambushing. To start, I'll explain the term "camping".  When someone calls someone else a "camper", it is used generically to describe someone who doesn't run and gun. It is used negatively of anyone who doesn't play the game like others think it should be played.

There is a time to camp, and a time not too. It's actually a very good strategy in Free for All deathmatch types. Hide, and kill people passing by. The misuse of camping is actually damaging in team deathmatch modes, though. A single person camping somewhere where no one passes by hurts the team in overall kills. In objective based games, camping can be used to great effect.

So, bad camping: this is when someone sets up somewhere in hopes that some random person will pass by so that they can get some easy kills. They don't want to be found. They just wait until someone randomly passes by to get the kill. Snipers are often accused of this, and in fact many people who claim to be snipers are simply campers.

Good camping is setting up where you can do one of two things. Either setting up where you can see the objective clearly, and are keeping the enemy from the objective. Or, setting up in a high traffic area where you know the enemy will be passing by. Both of these help your team in the long run. Snipers who really know how to be snipers are utilizing this type of camping.

Ambushing is closely related to good camping, but instead of setting up where you know people will be passing by, you are actually waiting for a specific person. Maybe someone is following you, and you step around a corner and hide, waiting for him to pass by. Or, you know that someone is using "Sit-Rep", so they can see where enemy equipment is. So you set out a bouncing betty or claymore, and wait for him to show up to destroy it.

Ambushing and good camping are actually very valid strategies in FPSs. Even though the term "camping" has a negative connotation to it, due to all the bad campers. But, just let the numbers show for themselves. If you are winning, keep playing like you want. Let the others call you what they will.

My next planned FPS strategy post will be on how to set up a well-rounded Capture the Flag team.

   - Woody

Tuesday, August 9, 2011

Making Fair and Balanced Teams in FPS

I already posted my thoughts on KDR vs Kill Spread in FPS. Now I will show why Kill Spread over KDR is more important in fair team making.

To start off, this actually came up in a round of Halo: Reach over system link recently. It was 3v3, and my team got smoked pretty badly. So the other team offered to give us their worst guy (Spread of -3), saying "4v2, that'll make it fair." In real life, yeah, I'd take the extra guy even if he sucked. However, in a race to a score, it's different. Giving us the guy with a -3 spread  actually would hurt our team, as I am sure you would agree if you've read my thoughts on KDR in FPS.

Now, how do we determine a fair match? Well, let's again take a look at KDR first. I have in front of me a set of people's stats that we'll look at. We'll use these stats this whole post, so I am going to let you see them up front. I am making up their names as well, to protect the horrible players.

Person                  Avg Kills           Avg Deaths                KDR                      Avg Spread
Bob                             4                       2                            2.0                               +2
John                            4                        1                            4.0                               +3
Joe                              3                        5                            .6                                 -2
Tim                             5                        5                              1.0                               0
Kevin                          5                         2                           2.5                               +3
Bill                              6                        3                             2.0                               +3

If you were to use the KDR of these guys, and matched up the top 3 and bottom 3, it would appear as if the top 3 would win (avg KDR 2.2 vs avg KDR 1.83) pretty easily. If the players each got their average kills however, the bottom team would win by 5. And if they all got their average spread, then the bottom team would win by 3.

NOTE-At this point it must be stated that these are AVERAGE scores. It is impossible to get these scores using these teams in one match. The KDR and Kill Spread over one match will always come out even when all players are taken into account, unless there's been suicides/betrayals.

The good thing about using average spread, is that if that is my average spread, you have a concrete number upon which you can base my skill. If I have an average spread of +4, you know I am going to get 4 more kills than deaths. It doesn't  matter if I die 10 times, I'll kill 14. If I die 5, I'll kill 9. You know how many net points I am going to get the team. With KDR, if I have a KDR of 2.0, that could be 2/1, 10/5, 20/10. You don't know how many net points I am going to get. You do know that I am going to help the team, just not how much.

So, using the average kill spread method, you can balance out teams for more fun gameplay; for if you had Kevin, Bill, and Joe on a team agains the others, (avg spread of 1.33 v 1.66)and they all got their usual Kills/Deaths, then the score would be (Counting kills as points, and deaths as points for the enemy) 22 to 23.

This will be clear to some, and unclear to others. This is about as good as I can explain it without showing you in person.

   - Sapper Woody

Tuesday, July 26, 2011

KDR in FPS's

   I was talking to some buddies about Call of Duty: Black Ops the other day. One common question that kept coming up was, "What is your KDR?" For those of you who don't know, KDR is short for Kill Death Ratio, or the amount of kills you get per each of your own deaths. For example, if you get 15 kills, and die 5 times in a match, your KDR for that match was 3.0, as 15 divided by 5 equals 3.
   This stat has kind of become the "end all" stat. This stat has become the sole stat in showing how good of a player you are at a certain game. (At least in deathmatch modes. In objective based modes it's not as important.) However, I have come to find out differently.
   Now, the KDR is an important stat. If you have a positive (greater than 1.0) KDR, then you are helping out the team. Negative KDR means that you actually hurt the team. I would much rather have a guy with a 2.0 KDR on my team than a guy with a .95, for instance.
   Here is where it gets hairy. When looking solely at the KDR stat, it would appear that a person with a 3.0 KDR is 2 times as good a player as the person with a 1.5. But there are so many variables to look at. It's possible that the person with a 3.0 KDR killed 3 people, and died 1 time, earning the team 3points, but losing it 1point for a net gain of 2 points. And the 1.5 KDR person could have 10 kills and 4 deaths, earning the team 10points, and losing 4points for a net gain of 6points. So, who is the better player?
   This is why I like HALO's score keeping better than COD's. In HALO, it shows you your K/D spread, instead of ratio.
   On a side note, I hate when I go my usual 1.25 KDR (normally about 10/8) in COD, and then there is someone who does something like 20/20 and then he calls me bad, because he has a higher score, when in reality he didn't help the team out at all in net gains. But that is a whole different rant for a different time.
   Back to KDR. My idea is to no longer ask people, "What is your KDR?", but rather ask them, "What is your Kill Spread?" This will give a much better picture of how much they will help out your team in each game. I have a lot more anecdotal evidence and number crunching, but I think I've made my point.

   - Sapper Woody

Saturday, April 9, 2011

Strategy: Focus Fire

One amazingly powerful aspect of any game is the ability to focus fire. This works in tabletops, First Person Shooters, strategy games, practically everywhere. The idea is this: by using all of your assets focused against one individual, you will destroy that individual and lower the overall DPS (Damage Per Second) of the other team as quickly as possible.

Look at it in this example: 2 teams (red and blue) are evenly matched. They each have 5 players with 5 HP (hit points), and each does 1 DPS. Now, the red team focus fires on one member of the blue team, whereas the blue team spreads out their damage, say 2/2/1 (2 fire at one, 2 fire at one, and 1 fires at one). In the 1st second, blue team is down one man. In the 2nd second, blue team is down 2 men. Now, in the 3rd second, it is possible that the red team loses a man, but simultaneously blue loses their third man. Now it is red's 4 to blue's 2.

At the beginning of the match, both teams had 25dps. If one team were to stand still and not attack, either team would have the other team down in 5 seconds. However, the one that focused their fire was the one who won the match.

Now, if the opposing team has people of differing HP/DPS, then the matter becomes a little more sticky. As a rule of thumb, you focus fire the enemy with the least HP first. However, there is a formula that can be used to determine a persons damage until death while focused. It is ((HPT1 / DPSUS) * DPST1) + (((HPT1 + HPT2) / DPSUS) * DPST2). You can continue this formula ad infinitum to adopt for more targets. In this formula, T# stands for the order in which that enemy would be targeted; T1 = Target 1, etc. US  obviously refers to us. Once the formula is figured, adding in the enemy as variables, then you have to switch the variables up, and check them against each other. The goal is to get the lowest possible outcome, as the answer is the total amount of damage the enemy will be able to deal (given no loss of your own DPS) until they are all dead.

As you can see, this formula is complex, and you have to know a lot about your target, and have time to determine which target to focus on. Since you normally won't have that kind of time, use the rule of thumb and focus fire on their lowest HP person.

   - Sapper Woody